 For my first big, informative post, I am going to uninstall my Grid (I made a copy, don't worry) and customize everything back the way it was from scratch so I can document every move I make. This way you can use the step-by-step process to make your Grid look enjoyable also.
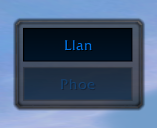
First, your Grid should look like the picture to the left when you first install it. I've removed the pesky tab that was sticking out by "Alt + Clicking" on the tab. Hmm. Looks pretty tiny, impractical, and ugly, doesn't it. Let's fix that by first beefing up the scaling.
Step 1) Increase Scaling
1) Move your Grid window to the left side of your screen, but not too close to the edge. This way you can see what you are doing when you make changes in the configuration menu.
2) Type "/grid config". (This will always bring up your main configuration window.)
3) Click on "Layout". Do not click the plus sign next to "Layout" because those will bring up different settings. Keep layout highlighted. Scroll down the page and where it says "Scale", slide that bar to about 1.5, or to a size that you feel comfortable with. You can always come back to this option and adjust the size throughout the tutorial.
Step 2) Mak
 ing the Boxes Look like "Health Bars"
1) Now, we can click on the small square plus sign next to "Frame". This will expand our menu selection and another tab called "Advanced" will pop up.
2) Select "Advanced", but make sure you are selecting the one under the "Frame" tree and not the one further down. Make sure you have "Advanced" highlighted.
3) Move the "Frame Height" and "Frame Width" sliders until you are comfortable with the width and height of your bars. They should begin to take on a more friendly shape!
4)Important: Click the drop down menu where it says "Orientation of Frame" and select Horizontal. This will make our bars fill from left to right, exactly how a normal health bar fills.
Step 3) Rearranging the Box Order
1) When inviting people to our party, we want our boxes to be created from left to right. This way, Group 1 is the top row of boxes, Group 2 is the next row, Group 3 is the third row, and so on and so forth.
2) Click on the word "Layout" and check the box that says "Horizontal Groups". Yes! Now we have Group 1 as the top row.
Step 4) Removing the Border (optional)
1) If you do not like the thick gray border around your Grid, don't fret. It can be made invisible. These steps will show you how to keep a little bit of space around your Grid so that you can have something to "grab" onto with your mouse when you need to move it.
2) While under "Layout", click the colored box (default is white) next to "Border". Drag the slider on the right hand side down to zero. This makes your border invisible.
3) If you haven't changed any other settings, you will still have some gray space around your boxes. This can also made to be invisible, but you can still click on it. I try to leave mine with a little bit of tinting so that I know where my edge is at. We'll play with this in Step 4.
Right now our Grid should look somewhat like this:

If someone appears to be "faded out" it means they are out of your range. For the moment, let's focus on the box with "Llan" in the middle. I am also going to scale my Grid down a little bit. Please see Step 1 if you have forgotten where to change this setting.
Are you getting the hang of it? If you are, good! If not, don't worry! Either way, let's keep playing with some more settings to make our Grid look even better and easier to use.
Step 4) Adjusting the Spacing and Padding
1) First, Spacing is the amount of gray area AROUND your entire Grid. Padding is the amount of gray area around your individual boxes. Big difference!
2) Click on "Layout" and scroll down the page. There are two sliders, one for padding and one for spacing.
3) I like a small amount of spacing around my Grid, so I try to keep my slider closer to the left.

I also like my boxes fairly close together so that I can move my mouse just a little bit faster. This means I keep my padding slider fairly close to the left also. Play around with these until you come up with an amount of spacing that you like. You can always come back and change it some more. As you can see in the above picture, my other party member is off in the wild somewhere, dying. The lighter part of the box is the health he has lost. The number in the center is the amount he has lost. In a raid, if you are trying to find someone, this can get frustrating if you can't see names.
Step 5) Removing the Health Deficit Option
1) For practicality, we don't need to see in numbers how much health a person has lost when we can look at the size of their health bar and judge if they are at 75%, 50%, 25%, or, well, dead.
2) Expand the box next to "Frame". Click on "Center Text" from the left menu. Scroll down the long list of boxes to the right until you find "Health Deficit". Uncheck this box. Now only important things will pop up such as "Dead"
"Offline" or the name of the player. You can also uncheck "Feign Death" because you want to still be able to see the health of a feigned hunter.
3) Incoming heals will still show up, so if you frequently forget where your tanks are, you may want to remove this also. A quick glance before the fight will show you. Also, Grid comes built in with a red box that shows up whenever someone has aggro.
Step 6) Adjusting the Central Names
1) Those names just won't do. We're going to make them longer and show all the letters (or mostly all) the letters in someone's name.
2) Click on "Frame" and have it highlighted. Find "Center Text Length" and drag the bar all the way to the right. Now everyone's name will show up in the center of the box and won't be abbreviated.
3) Go back to the left menu and click on "Advanced". Make sure this is the "Advanced" under the "Frame" tree and not the one under the "Layout" tree. Scroll down on the right side until you find the options to change the font size and face.
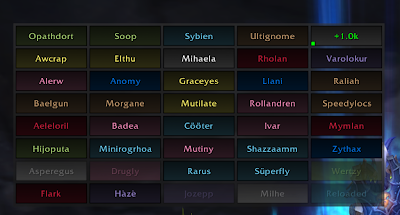
Here's an example of what we have so far in Alterac Valley. It's really big right now but that is so all the features we are changing show up clearly. We'll scale it back down at the end of the tutorial.

This screenshot was taken while almost everyone was within 40 yards (or healing range) of me. You can see a green square and a green number on one of the boxes. This box means that the target is receiving healing and the approximate amount is displayed as green text in the center of their box.
At this point, you have everything you need for basic function in a raid. What I am going to do is introduce you first to mouseover macros and Clique, and then to GridStatusHots and GridIndicatorCornerIcons, which will show you which characters (boxes) have your HoTs on them, and which characters have certain spells/debuffs placed on them. One example of this is Incinerate Flesh from Lord Jaraxxus in the Trial of the Crusader. A simple box pops up in one corner to show you which person has the debuff. In a 25 man raid, when people are taking damage and you can't see names, this is of utmost importance!
Go ahead and scale down your Grid to a size you are comfortable with, and if you need to adjust the boxes, use the aforementioned steps until you have it looking the way you want.
Cleansing and Decursing Debuffs with Clique

Next, let's download and install Clique. Clique allows you to hover over anyone's box in your Grid and either push a key or click a side mouse button to Remove Curse, Remove Poison, Purify, Cleanse, Remove Disease, or Dispel Magic. If I missed anything, you can do it. For now, let's keep it simple and just use Clique for your cleansing spells.
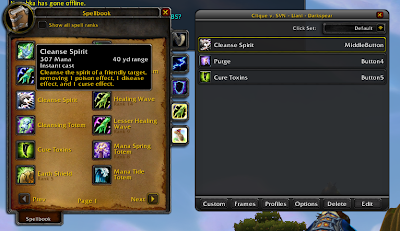
When you install clique, you're going to have an extra tab on your spellbook that looks like the one on the left. It's at the very bottom. For the next steps, you MUST be out of combat. No exceptions. If you are in combat, Clique will not respond or work.
Step 1) Binding a Spell
1) Let's bind the spell "Remove Curse". If you are a priest, let's use "Dispel Magic". If you are a druid, you can use "Remove Poison". If you are any other class with a spell removing ability, then go ahead and use that spell.
2) Open the Clique Tab. This will activate Clique in the way that anything you click on in your spellbook, it is going to record it. You need to be VERY careful what you click on!
3) I chose to bind my Remove Curse to my middle mouse key. What you do is click on your chosen spell WITH the key or mouse button that you want to use when casting that spell. Therefore, when I need to remove a curse from someone on my Grid, I hover over their box and click my middle mouse button. You can also be targeting this person but it is NOT required! All you have to do is be hovering over their box. Totally easy! You can do this with any other cleansing spell you want. My Purge spell is bound to one of my side keys. In this case, it helps to have a gaming mouse (with 1-2 extra side mouse buttons).

In the above picture you can see that I have bound Remove Curse to my middle mouse button. Success! When you are done binding your keys, you MUST CLICK THE "X" AND CLOSE CLIQUE! Otherwise it will stay open and you may accidentally start binding stuff you do not want.
Healing with Mouseover Macros
Now that we've got a working Grid and Clique, let's move over to some simple mouseover macros for healing. This version is courtesy of Tott, who was kind enough to drop a note on a shortened version.
/cast [@mouseover,help][help][@player] Lifebloom
This macro means “If I have a mouseover target, cast Lifebloom on them.
If I don't have a mouseover target but I have a normal target, cast Lifebloom on them.
If I don't have a mouseover target or normal target, cast Lifebloom on me.”
According to Matticus at World of Matticus, "If you want the Blizzard standard spell icon to display instead of using a new one of your choice, write your macro as shown below and choose the red question mark as your icon. The #showtooltip command will update that question mark to the default icon for that spell." This is a convenient way to avoid searching through your icon book for the exact spell icon.